
Bismuth is a chemical element and a metal with number 83 in the periodic table. Bismuth has an unusual property for a metal in which it expands as it changes from a liquid to a solid and crystals are formed. Bismuth is also the name given to the first blockchain implementation written in Python. The Bismuth blockchain project with it’s associated features and tools aim to be a “construction set for blockchain technology” or “the Lego of blockchains”. Inspired by the metal the Bismuth blockchain ecosystem will also “expand as it solidifies”, with many new developers and future use-cases.
Tornado is a Python-based web framework and asynchronous networking library. It is an ideal framework for a Bismuth wallet and distributed app (Dapp) development environment. Motivated by the metal and in the spirit of being a construction set, the Tornado wallet also has a plugin feature which has been given the name “Crystal”. In this blog article the crystal framework in Bismuth’s Tornado wallet is introduced with a “Hello World” example. The article is written with the goal to help new Dapp developers getting started with the Bismuth ecosystem. Specifically, the Hello World crystal demonstrates the following features:
- Collecting blockchain data using the library bismuthclient
- Collecting data from a 3rd party API
- Displaying data with html using Tornado templates
- Displaying a pop-up message using get/post methods and javascript
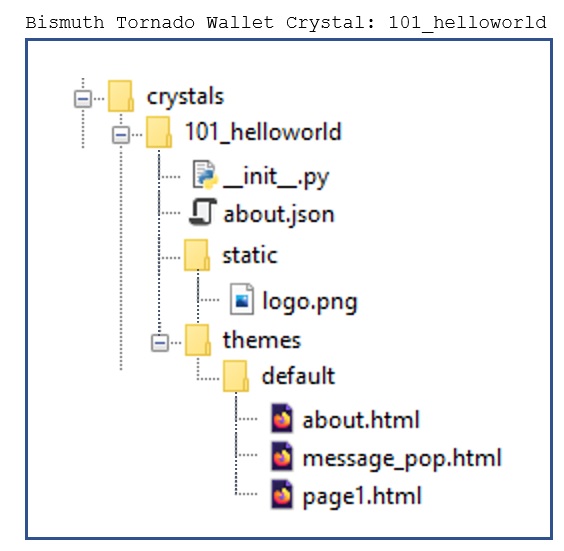
Each crystal in the wallet is given a unique number, followed by an underscore and the name, in this case it is: 101_helloworld. The figure below shows the files and folder structure of the Hello World crystal. The example consists of one Python file (__init__.py), one data file (about.json), one graphics file (logo.png), and three html files (about.html, message_pop.html and page1.html).
General information about a crystal can be found in the about.json file. In this example the contents is as follows:
{
  "author": "GH2",
  "description": "Hellow world example crystal for the Tornado wallet",
  "email": "N/A",
  "version": "1.0.0",
  "date": "2020-04-11",
  "url":"https://github.com/bismuthfoundation/TornadoWallet/tree/master/wallet/crystals/101_helloworld"
}
The main file of the HelloWorld crystal is the Python file __init__.py. This file contains a class named HelloworldHandler which again contains 7 functions as illustrated in the figure below.

The first four functions, get(), post(), get_template_path() and static(), are generic and should be part of any crystal. The two functions get() and post() handle get and post form requests from html or javascript and will be described later. The function get_template_path() just returns DEFAULT_THEME_PATH, to let Tornado know where to find the html files. In the Hello World crystal this path is defined to be the base path plus crystals/101_helloworld/themes/default The fourth function, static() just creates a static handler pointing to a local /static crystal folder.
The fifth function, about(), contains the following Python code:
    async def about(self, params=None):
        self.render("about.html", bismuth=self.bismuth_vars)
It means that when Tornado receives an url request of http://127.0.0.1:8888/crystal/helloworld/about the about() Python function inside __init__.py is called. All this function does is to render the about.html file and pass the variable “bismuth” to it. The html file about.html is stored in the folder specified by DEFAULT_THEME_PATH. The file about.html contains the opening screen of the crystal 101_helloworld, shown below.
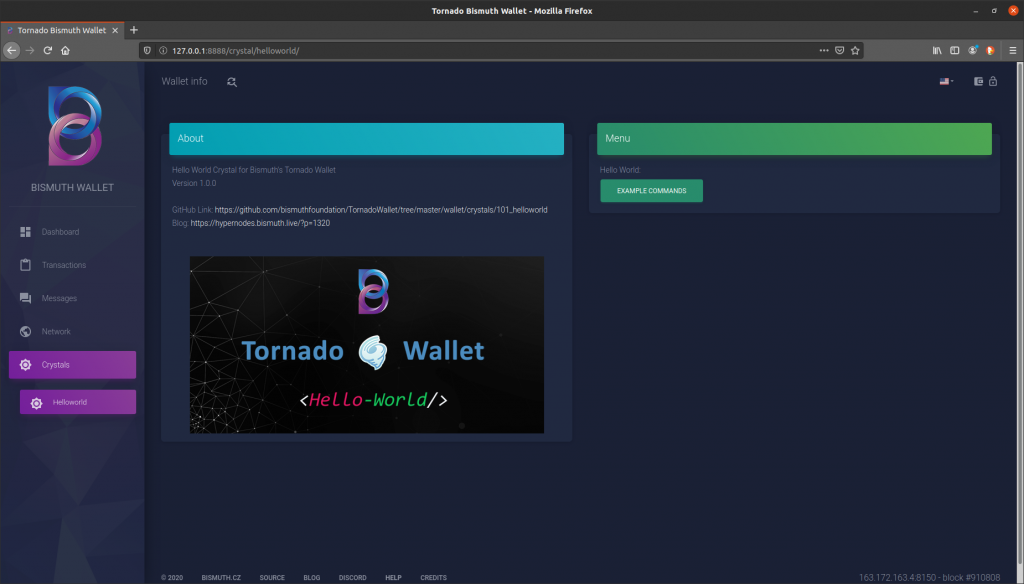
Bismuth’s Tornado wallet is based on the Material Dashboard Dark Edition and the documentation for it can be found here: https://demos.creative-tim.com/material-dashboard-dark/docs/2.0/getting-started/introduction.html For example, the button in the figure above is formatted using: class=”btn btn-success”
The displayed logo is the file logo.png in the static/ folder. The first two lines of code in about.html are:
{% extends "base.html" %}
<!-- "../../../../themes/material/base.html" -->
The symbols {% and %} are used by the Tornado templates. In this case about.html extends the parent wallet file base.html. The crystal can then make use of styling and formatting inherited from the wallet. The theme and css framework in the Tornado wallet try to be semantic. For example, the css uses success/danger/error/info as class names, so it does not depend on a specific color theme and remains consistent. If the Tornado wallet were later to switch to another template, there would be no changes required in the crystals such as color or css. If the devs always use for example “-danger” the crystals would use the theme color for that. Keeping this in mind ensures that the crystals will be compatible with alternative themes. As an example the following two lines in about.html:
<div class="card-header card-header-info">
<div class="card-header card-header-success">
generate the turqoise and green menus labeled “About” and “Menu”, respectively, in the screenshot above.
Except for the Tornado templates, about.html contains pure html code. When clicked, the command button in about.html opens up page1. When page1.html opens it displays two cards named “Commands” using card-header-info (turqoise color) and “Output” using card-header-success (green color). The Commands card contains 4 buttons and a text input field. The first button “Show Latest Account Transactions” generates a <table> in the Output card with data obtained from the blockchain for the active account in the wallet. The Python code to obtain the blockchain data is:
button1 = self.get_argument("button1", default=None, strip=False)
if button1 is not None:
    data['txs'] = self.bismuth.latest_transactions(5, for_display=True, mempool_included=True)
...
self.render("page1.html", bismuth=self.bismuth_vars, data=data)
The dict data[‘txs’] is passed back to page1.html where it is rendered using the following Tornado templates:
<table>
<tr><td>Block Height</td><td>Amount</td><td>Recipient</td><td>Timestamp</td></tr>
    {% for item in data['txs'] %}
        {% block item %}
            <tr><td>{{ item['block_height'] }}</td><td>{{ item['amount'] }}</td><td>{{ item['recipient'] }}</td><td>{{ datetime.datetime.utcfromtimestamp(item['timestamp']).strftime('%Y-%m-%d %H:%M:%S') }}</td></tr>
        {% end %}
    {% end %}
</table>
The Tornado template {{ variable_name }} outputs the Python variable into the html page.
The second button “Show Hypernodes” collects data from an external site using the following Python code:
button2 = self.get_argument("button2", default=None, strip=False)
if button2 is not None:
    data['hns'] = await async_get_with_http_fallback("https://hypernodes.bismuth.live/status.json")
...
self.render("page1.html", bismuth=self.bismuth_vars, data=data)
The dict data[‘hns’] is then rendered in page1.html using Tornado templates as follows:
<table>
<tr><td>IP Address</td><td>Height</td></tr>
{% for key,value in data['hns'].items() %}
    {% block key %}
        <tr><td>{{ key }}</td>
        {% if value == -1 %}
            <td><font color="red">Inactive</font></td>
        {% else %}
            <td>{{ value }}</td>
        {% end %}
        </tr>
    {% end %}
{% end %}
</table>
As can be seen from this example, Tornado templates allow for embedding Python code into the html file to display data, similar to the templates <?php … ?> for those familiar with PHP.
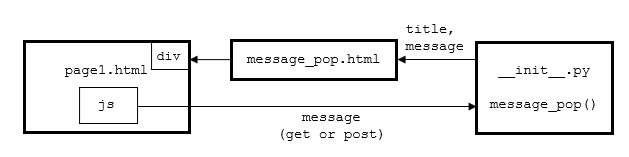
The last two buttons in page1.html generate the “Hello World” pop-up message. When clicking on either of these two buttons, one of two javascript functions, message_get() or message_post(), defined in page1.html is called. The two javascript functions are implemented as follows:
<script>
function message_get(title,msg,type){
    $.get('message_popup?msg=' + msg + '&title=' + title + '&type=' + type,function(page){
        $("#message_window").html(page);
        $("#message_window").modal("show");
        });
}

function message_post(title,msg,type){
    var xsrf = $("[name='_xsrf']").val();
    $.post('message_popup', { msg: msg, title: title, type: type, _xsrf: xsrf }, function(page){
        $("#message_window").html(page);
        $("#message_window").modal("show");
    });
}
</script>
Note that the _xsrf token is required in order to post data. In addition the following template must be included in page1.html in order to allow posting:
{% raw xsrf_form_html() %}In some cases it is preferred to post() data to Tornado instead of get() to avoid the data being displayed in the url at the top of the browser. Examples are cases where the end-user has to type in a password or a pin code.
The javascript functions call the Python function message_popup() which contains the following code:
    async def message_popup(self, params=None):
        title = self.get_argument("title", default=None, strip=False)
        message = self.get_argument("msg", default=None, strip=False)
        type = self.get_argument("type", default=None, strip=False)
        self.render("message_pop.html", bismuth=self.bismuth_vars, title=title, message=message, type=type)
The type can be either “info”, “warning” or “danger” resulting in different colors used in the pop up message.
The file page1.html includes a hidden element:
<div id="message_window" class="modal" tabindex="-1" role="dialog"></div>The hidden “message_window” gets replaced by the html code inside message_pop.html by the following two commands in the javascript callback function:
$("#message_window").html(page);
$("#message_window").modal("show");
The pop-up is therefore not a separate window in the browser, but is part of the page1.html file. The steps involved to generate this pop-up include a combination of javascript and Python and these are illustrated in the figure below.
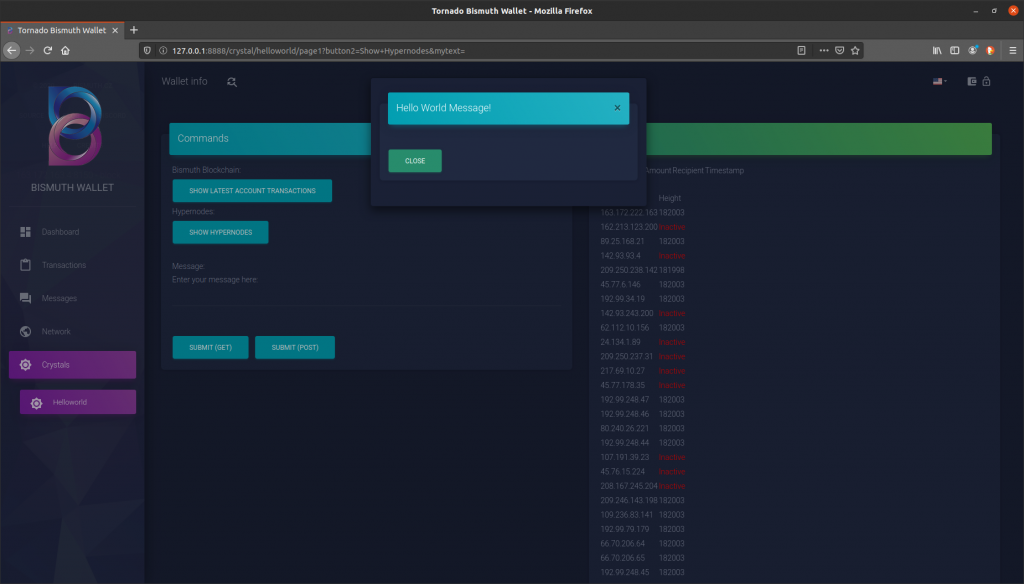
The screenshot below shows the page1.html screen after “Show Hypernodes” followed by “Submit (Post)” have been clicked. The message inside the pop-up window is generated from the text input field above the two Submit buttons.
This blog article has described the file structure and contents of the Hello World crystal in Bismuth’s Tornado wallet. The purpose of this article has been to explain some common functions and features which are believed that most future Dapp developers will need (display of blockchain and 3rd party data, interaction between Python, javascript and html and display of messages).
The GitHub link for the Tornado Wallet and all of it’s crystals supported by the Bismuth Foundation is: https://github.com/bismuthfoundation/TornadoWallet